Welcome to JH's Blog!
-
Linux内核网络子系统源码分析(1) -- socket系统调用和关键数据结构
- 内核初始化相关/网络子系统初始化
- Socket系统调用流程
- 一. 首先调用到sock_create
- 1. __sock_create
- 1.1 调用secutiry子系统的方法secutiry_ops->socket_create去security子系统折腾了一圈;
- 1.2 sock_alloc: 分配struct socket
- 1.3 从全局net_families数组中根据下标family取到对应的struct net_proto_family结构pf;
- 1.4 关键的一步调用到pf->create, 按照上面的描述, 调用到了net/ipv4/Af_inet.c的inet_create方法.
- 1. 先将struct socket的state设为SS_UNCONNECTED;
- 2. 根据struct socket的type(SOCK_STREAM之类), 遍历inetsw[type], 找到对应到protocol的结构体;
- 3. 将”对应到protocol的结构体”的ops赋给struct socket结构的ops.
- 4. 调用sk_alloc, 分配网络子系统核心(net/core)的数据结构struct sock ( 记录family, protocol到sk_family, sk_prot成员 )
- 5. 然后直接将struct sock强转为struct inet_sk(调用inet_sk), 设置一些inet的参数.
- 6. 根据ipv4_config.no_pmtu_disc, 设置struct inet_sock的pmtudisc标志位DONT或者WANT.
- 7. 调用sock_init_data(struct socket, struct sock)
- 8. sk->sk_backlog_rcv ( 收到backlog的回调函数 ) 初始化为sk->sk_prot->backlog_rcv
- 9. inet->ut_ttl ( Unicast的TTL )为1
- 10. inet->mc_loop ( Multicast的loop ) 为1
- 11. inet->mc_ttl ( Multicast的TTL ), mc_all为1
- 12. inet->mc_index ( Multicast的device index )为0
- 13. 如果inet->inet_num ( local port? )不为空,
- 14. 调用sk->sk_prot->init, 例如对于TCP, 指向net/ipv4/Tcp_ipv4.c的全局结构体struct proto tcp_port中的tcp_v4_init_sock, 此方法完成该socket在内核网络子系统TCP层的初始化:
- 1.5 调用secutiry子系统的方法secutiry_ops->socket_post_create去security子系统折腾了一圈;
- 1. __sock_create
- 二. 调用sock_map_fd将struct socket挂接到fd供进程使用.
- 一. 首先调用到sock_create
这部分代码看了有几年了,归纳总结的想法也想了几年,刚好最近比较空,把这部分代码流程梳理了一下,总结成一篇blog,记录一下。
内核初始化相关/网络子系统初始化
内核初始化过程中,依次调到arch/
/boot -> arch/ /kernel -> start_kernel start_kernel最后调到do_basic_setup()(init/main.c):
static void __init do_basic_setup(void)
{
    cpuset_init_smp();
    usermodehelper_init();
    shmem_init();
    driver_init();
    init_irq_proc();
    do_ctors();
    usermodehelper_enable();
    do_initcalls();
}
do_initcalls()(init/main.c)方法如下:
static void __init do_initcalls(void)
{
    initcall_t *fn;

    for (fn = __early_initcall_end; fn < __initcall_end; fn++)
        do_one_initcall(*fn);
}
其中__early_initcall_end, __initcall_end定义在Vmlinux.lds.h中:
#define INITCALLS                           \
    *(.initcallearly.init)                      \
    VMLINUX_SYMBOL(__early_initcall_end) = .;           \
    *(.initcall0.init)                      \
    *(.initcall0s.init)                     \
    *(.initcall1.init)                      \
    *(.initcall1s.init)                     \
    *(.initcall2.init)                      \
    *(.initcall2s.init)                     \
    *(.initcall3.init)                      \
    *(.initcall3s.init)                     \
    *(.initcall4.init)                      \
    *(.initcall4s.init)                     \
    *(.initcall5.init)                      \
    *(.initcall5s.init)                     \
    *(.initcallrootfs.init)                     \
    *(.initcall6.init)                      \
    *(.initcall6s.init)                     \
    *(.initcall7.init)                      \
    *(.initcall7s.init)

#define INIT_CALLS                          \
        VMLINUX_SYMBOL(__initcall_start) = .;           \
        INITCALLS                       \
        VMLINUX_SYMBOL(__initcall_end) = .;
可见, 在__early_initcall_end和__initcall_end之间是从.initcall0.init到.initcall7s.init这几个段的函数指针.
这几个段里分别放的哪些函数指针呢?
在inlude\linux\init.h中, 有如下的宏定义:
#define pure_initcall(fn)       __define_initcall("0",fn,0)

#define core_initcall(fn)       __define_initcall("1",fn,1)
#define core_initcall_sync(fn)      __define_initcall("1s",fn,1s)
#define postcore_initcall(fn)       __define_initcall("2",fn,2)
#define postcore_initcall_sync(fn)  __define_initcall("2s",fn,2s)
#define arch_initcall(fn)       __define_initcall("3",fn,3)
#define arch_initcall_sync(fn)      __define_initcall("3s",fn,3s)
#define subsys_initcall(fn)     __define_initcall("4",fn,4)
#define subsys_initcall_sync(fn)    __define_initcall("4s",fn,4s)
#define fs_initcall(fn)         __define_initcall("5",fn,5)
#define fs_initcall_sync(fn)        __define_initcall("5s",fn,5s)
#define rootfs_initcall(fn)     __define_initcall("rootfs",fn,rootfs)
#define device_initcall(fn)     __define_initcall("6",fn,6)
#define device_initcall_sync(fn)    __define_initcall("6s",fn,6s)
#define late_initcall(fn)       __define_initcall("7",fn,7)
#define late_initcall_sync(fn)      __define_initcall("7s",fn,7s)
可见, 在内核源码中,我们经常看到的诸如core_initcall, arch_initcall, subsys_initcall, fs_initcall宏调用,实际是将函数放到0 ~ 7s对应的段中, 以便于内核在初始化时候进行调用。
比如在内核的网络子系统部分(net/), 网络子系统sysctl interface的初始化逻辑放在net/sysctl_net.c中, 便调用了subsys_initcall宏:
static __init int sysctl_init(void)
{
    int ret;
    ret = register_pernet_subsys(&sysctl_pernet_ops);
    if (ret)
        goto out;
    register_sysctl_root(&net_sysctl_root);
    setup_sysctl_set(&net_sysctl_ro_root.default_set, NULL, NULL);
    register_sysctl_root(&net_sysctl_ro_root);
out:
    return ret;
}
subsys_initcall(sysctl_init);
Socket系统调用流程
Socket系统调用的作用是创建一个socket, 该系统调用传入的参数为:
int socket(int family, int type, int protocol)Socket系统调用实现入口位于Linux内核的网络子系统顶层代码中(net\socket.c).
一. 首先调用到sock_create
sock_create(family, type, protocol, &sock)在这个第一层函数sock_create里, 比起socket系统调用来多出来第四个参数&sock,
这个参数是一个结构体, 定义如下:
struct socket {
    socket_state        state;
    kmemcheck_bitfield_begin(type);
    short           type;
    kmemcheck_bitfield_end(type);
    unsigned long       flags;
    struct socket_wq __rcu  *wq;
    struct file     *file;
    struct sock     *sk;
    const struct proto_ops  *ops;
};
其中:
- state为枚举类型: SS_FREE, SS_UNCONNECTED, SS_CONNECTING, SS_CONNECTED, SS_DISCONNECTED. ( 比较好理解 );
- type为诸如SOCK_STREAM之类的;
- flags是标记;
- wq是一个wait queue, 具体怎么用后面会提到;
- file是供gc使用的文件描述符;
- sk是比较重要的数据结构, 指向代表下层协议(network layer)数据的sock结构
1. __sock_create
sock_create向下调到第二层方法:
__sock_create(current->nsproxy->net_ns, family, type, protocol, res, 0);这一层函数引入了一个新的参数struct net, 后面再做分析。
在__sock_create这一层:
1.1 调用secutiry子系统的方法secutiry_ops->socket_create去security子系统折腾了一圈;
1.2 sock_alloc: 分配struct socket
1.2.1 通过sockfs中分配一个inode ( sockfs的初始化详见net/socket.c的sock_init方法 )
1.2.2 基于inode结构取到socket结构 ( 怎么取到的? 这里使用的是著名的container_of宏 )
container_of宏实现如下:
#define container_of(ptr, type, member) ({          \
   const typeof( ((type *)0)->member ) *__mptr = (ptr);    \
   (type *)( (char *)__mptr - offsetof(type,member) );})
先new一个指针__mptr,指针所指类型和type内的member成员一样, 并指向传入的待求container数据ptr;
该指针__mptr便存放着待求container的数据ptr的内存地址, 并且有正确的类型;
然后用这个内存地址减去type内部的member成员的偏移量, 便是包含ptr这个类型为type的结构体的起始地址, 强转为type指针类型, 即为结果.
通过调用container_of宏, 使用inode结构取到了socket结构, 返回.
1.3 从全局net_families数组中根据下标family取到对应的struct net_proto_family结构pf;
全局net_families数组是一个维护着系统全局所有网络簇信息的一个数组结构.
net_families数组通过sock_register/sock_unregister添加/删除元素. ( 最多40个元素, 可以理解为下层协议的数据结构, 例如ipv4, ipv6, netlink, appletalk, bluetooth等, 本文后面部分采用ipv4作为示例. )
sock_register/sock_unregister通常在net/xxx/Af_xxx.c中调用.
例如对于INET, 在net/ipv4/Af_inet.c中将INET的struct net_proto_family结构添加到全局net_families数组中.
INET的struct net_proto_family定义如下:
static const struct net_proto_family inet_family_ops = {
    .family = PF_INET,
    .create = inet_create,
    .owner  = THIS_MODULE,
};
1.4 关键的一步调用到pf->create, 按照上面的描述, 调用到了net/ipv4/Af_inet.c的inet_create方法.
1. 先将struct socket的state设为SS_UNCONNECTED;
2. 根据struct socket的type(SOCK_STREAM之类), 遍历inetsw[type], 找到对应到protocol的结构体;
注意:
inetsw是一个链表数组, key为SOCK_STREAM, SOCK_DGRAM, SOCK_RAW等等.
inetsw的初始化在net/ipv4/Af_inet.c的inet_init方法中:
-
先初始化inesw为SOCK_STREAM/SOCK_DGRAM/SOCK_RAW等作为key的list_head数组;
-
遍历inetsw_array, 将其挂入inetsw中.
inetsw_array的元素封装了TCP, UDP, PING, RAW等协议, 即为上文中描述的”对应到protocol的结构体”.
inetsw_array的元素结构如下:
static struct inet_protosw inetsw_array[] =
{
    {
        .type =       SOCK_STREAM,
        .protocol =   IPPROTO_TCP,
        .prot =       &tcp_prot,
        .ops =        &inet_stream_ops,
        .no_check =   0,
        .flags =      INET_PROTOSW_PERMANENT |
                  INET_PROTOSW_ICSK,
    }
...
}
3. 将”对应到protocol的结构体”的ops赋给struct socket结构的ops.
例如如果type是SOCK_STREAM, protocol是TCP, 将&inet_stream_ops赋给struct socket结构的ops.
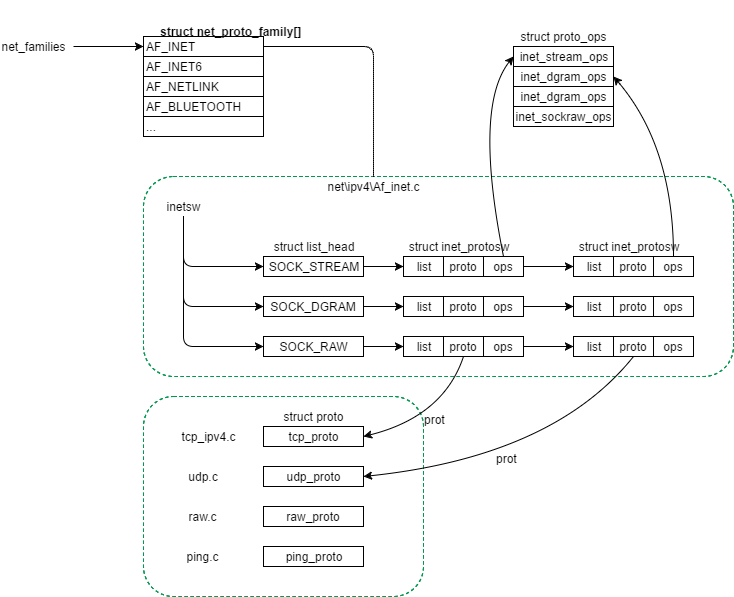
各个数据结构关系如下图:
4. 调用sk_alloc, 分配网络子系统核心(net/core)的数据结构struct sock ( 记录family, protocol到sk_family, sk_prot成员 )
这里所做的sk_alloc调用, 传入的answer_prot指向tcp_prot, 故分配的大小为struct tcp_sock. (见net\ipv4\tcp_ipv4.c的struct proto tcp_prot结构体的obj_size字段):
struct proto tcp_prot = {
    ...
    .obj_size = sizeof(struct tcp_sock),
    ...
}
调用sk_alloc的代码如下:
sock->ops = answer->ops;
answer_prot = answer->prot;
...
sk = sk_alloc(net, PF_INET, GFP_KERNEL, answer_prot);
struct sock的sk_prot指向“对应到protocol的结构体”中的prot, 即&tcp_prot;
5. 然后直接将struct sock强转为struct inet_sk(调用inet_sk), 设置一些inet的参数.
注意1:
之所以struct sock可以强转为struct inet_sk, 是因为在sk_alloc()时分配的是struct tcp_sock结构大小(但是返回的是struct sock).
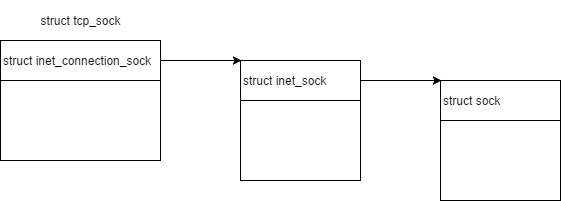
tcp_sock, inet_sock, sock三个结构体的关系为:
tcp_sock 包含 inet_connection_sock 包含 inet_sock 包含 sock
图示如下:
注意2:
如果是SOCK_RAW, 会把socket系统调用传入的protocol值直接存放在struct inet_sock的inet_num成员作为local port.
通常protocol值代表IP之上的协议代号, 定义在include\linux\ln.h里:
enum {
  IPPROTO_IP = 0,       /* Dummy protocol for TCP       */
  IPPROTO_ICMP = 1,     /* Internet Control Message Protocol    */
  IPPROTO_IGMP = 2,     /* Internet Group Management Protocol   */
  IPPROTO_IPIP = 4,     /* IPIP tunnels (older KA9Q tunnels use 94) */
  IPPROTO_TCP = 6,      /* Transmission Control Protocol    */
  IPPROTO_EGP = 8,      /* Exterior Gateway Protocol        */
  IPPROTO_PUP = 12,     /* PUP protocol             */
  IPPROTO_UDP = 17,     /* User Datagram Protocol       */
  IPPROTO_IDP = 22,     /* XNS IDP protocol         */
  IPPROTO_DCCP = 33,        /* Datagram Congestion Control Protocol */
  IPPROTO_RSVP = 46,        /* RSVP protocol            */
  IPPROTO_GRE = 47,     /* Cisco GRE tunnels (rfc 1701,1702)    */

  IPPROTO_IPV6   = 41,      /* IPv6-in-IPv4 tunnelling      */

  IPPROTO_ESP = 50,            /* Encapsulation Security Payload protocol */
  IPPROTO_AH = 51,             /* Authentication Header protocol       */
  IPPROTO_BEETPH = 94,         /* IP option pseudo header for BEET */
  IPPROTO_PIM    = 103,     /* Protocol Independent Multicast   */

  IPPROTO_COMP   = 108,                /* Compression Header protocol */
  IPPROTO_SCTP   = 132,     /* Stream Control Transport Protocol    */
  IPPROTO_UDPLITE = 136,    /* UDP-Lite (RFC 3828)          */

  IPPROTO_RAW    = 255,     /* Raw IP packets           */
  IPPROTO_MAX
};
如下的代码没有使用系统预留的protocol, 而是利用RFC 3692定义的253端口做测试用:
...
socket(AF_INET, SOCK_RAW, 253)
...
6. 根据ipv4_config.no_pmtu_disc, 设置struct inet_sock的pmtudisc标志位DONT或者WANT.
注意:
PMTUD全称Path MTU Discovery, 指的是在两个IP host间决定Maximum Transmission Unit ( MTU )的技术, 目的是避免IP分片.
由此可见, 这个PMTUD在内核里面是可配的!!!
7. 调用sock_init_data(struct socket, struct sock)
从函数原型上可以看出, 是借助struct socket来初始化网络层核心数据结构struct sock:
- sk->sk_receive_queue, sk_write_queue, sk_error_queue ( 如果配了NET_DMA, 还有sk_async_wait_queue )
- sk->sk_send_head
- sk->sk_timer
- sk->sk_rcvbuf ( 这里指的是rmem )
- sk->sk_sndbuf ( 这里指的是wmem )
- sk->sk_state ( 初始值为TCP_CLOSE )
- 接管struct socket的wq
- sk->sk_dst_lock
- sk->sk_callback_lock
- sk->sk_rcvlowat ( SO_RCVLOWAT )
- sk->sk_rcvtimeo ( SO_RCVTIMEO )
- sk->sk_sndtimeo ( SO_SNDTIMEO )
- sk->sk_stamp ( 上一个packet收到的timestamp )
8. sk->sk_backlog_rcv ( 收到backlog的回调函数 ) 初始化为sk->sk_prot->backlog_rcv
例如对于TCP, backlog_rcv指向net/ipv4/Tcp_ipv4.c的全局结构体struct proto tcp_prot中的tcp_v4_do_rcv
9. inet->ut_ttl ( Unicast的TTL )为1
10. inet->mc_loop ( Multicast的loop ) 为1
11. inet->mc_ttl ( Multicast的TTL ), mc_all为1
12. inet->mc_index ( Multicast的device index )为0
13. 如果inet->inet_num ( local port? )不为空,
意味着该protocol允许并且已经在socket创建时指定local Port, 于是调用sk->sk_prot->hash(sk).
例如对于TCP, hash()指向net/ipv4/Tcp_ipv4.c的全局结构体struct proto tcp_prot中的inet_hash:
该方法按local Port计算hash key, 在&tcp_hashinfo->listening_hash按hash key, 将struct sock插入tcp的listening_hash链表.
但是似乎这个hashtable元素只有32个, 为什么这么小? (待看)
14. 调用sk->sk_prot->init, 例如对于TCP, 指向net/ipv4/Tcp_ipv4.c的全局结构体struct proto tcp_port中的tcp_v4_init_sock, 此方法完成该socket在内核网络子系统TCP层的初始化:
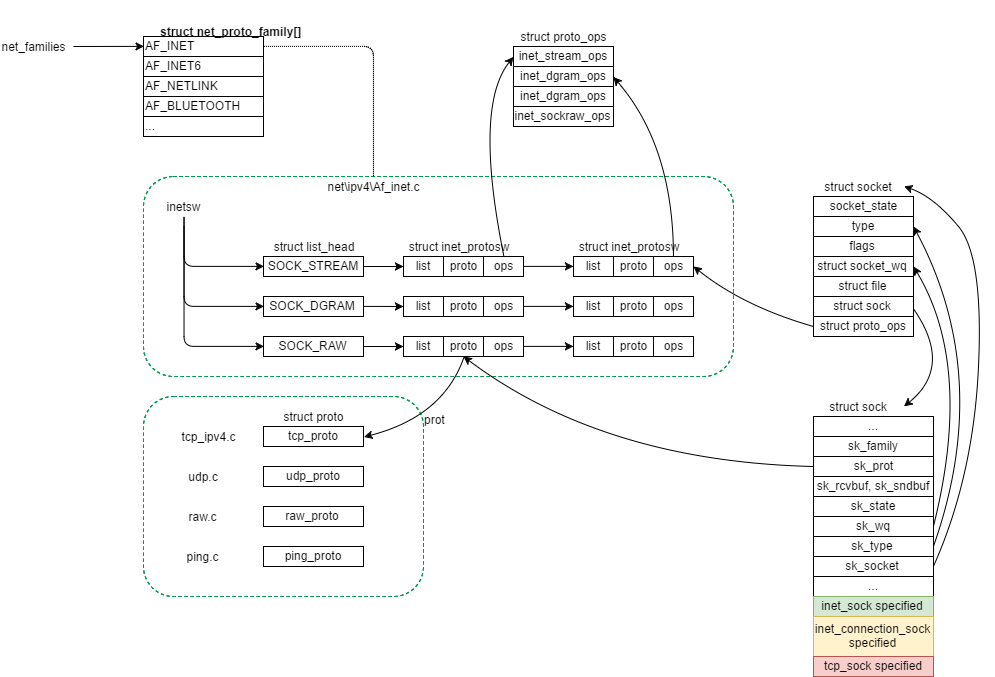
注意: TCP层有自己的数据结构struct tcp_sock, 从struct sock强转而来(下图图示中”tcp_sock specified”部分为struct tcp_sock的专有数据, 内存布局于common字段的后面, 故可以使用强制类型转换于struct sock互转)
- out_of_order_queue初始化 ( 该queue用于存放Out of order的segment )
- 初始化三个timer: retransmit_timer <-> net/ipv4/tcp_timer.c的tcp_write_timer delack <-> net/ipv4/tcp_timer.c的tcp_delack_timer keepalive <-> net/ipv4/tcp_timer.c的tcp_keepalive_timer
- “Data for direct copy to user” ( 称为prequeue )的init ( 机制待细看 )
- RTO ( Retransmit Time Out ) 初始化为1*HZ
- mdev 初始化为1*HZ ( mdev是什么待细看 )
- snd_cwnd初始化为10 ( Sending Congestion Window )
- snd_ssthresh初始化为0x7fffffff ( 慢启动size threshold )
- snd_cwnd_clamp初始化为~0 ( snd_cwnd的上限 )
- mss_cache初始化为536U
- reordering初始化为sysctl_tcp_reordering ( packet reording metric )
- icsk->icsk_ca_ops ( pluggable congestion control hook 可插拔的拥塞控制hook )
- sk->sk_state设为TCP_CLOSE …
至此pf->create调用结束, 也就是inet_create方法调用结束.
图示如下:
1.5 调用secutiry子系统的方法secutiry_ops->socket_post_create去security子系统折腾了一圈;
至此__sock_create调用结束.
至此socket系统调用中sock_create调用结束.
二. 调用sock_map_fd将struct socket挂接到fd供进程使用.
1. 调用sock_alloc_file, 传入struct socket, struct file和flag
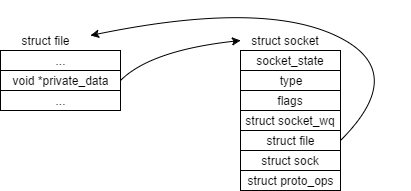
将struct socket的file设为struct file;
将struct file的private_data设为struct socket;
这样struct socket和struct file便互相关联起来了.
2. 调用fd_install将file descriptor加入fd array
至此, 整个socket系统调用结束.
-
逆向wininet.dll的过程
wininet.dll是Windows提供的通过HTTP, FTP等应用层协议访问网络资源的一个库。
提供的API例如InternetOpen, InternetConnect, HttpOpenRequest, HttpSendRequest等。
HINTERNET作为wininet提供给用户应用的句柄, HttpOpenRequest, HttpSendRequest发起请求均是通过HINTERNET句柄来完成.
这个HINTERNET并不是raw socket handler,而是wininet封装raw socket handler提供给用户应用使用的一个数据结构。
这个HINTERNET带来了很多不便:
- HINTERNET并没有暴露足够多的接口去获取所有的TCP连接信息;
- 即便HINTERNET提供了足够的接口, 但是这些接口并不是socket标准接口, 获取不到raw socket handler, 很多标准socket方法无法使用。
于是便萌生了想法, 逆向一下wininet.dll看有没有办法挖出HINTERNET和raw socket handler之间的关系, 从而获取到raw socket handler.
用WinDbg抓下wininet.dll的symbol, 用Visual Studio反汇编, 单步跟进HttpSendRequest方法.
发现HttpSendRequest调用了一个_mapHandleToAddress的内部方法.
从名字上看,这个内部方法很像是我要找的方法。
继续用Visual Studio的Assembly模式,跟进_mapHandleToAddress内部, 从汇编代码逻辑可以看到, 该方法接受HINTERNET为参数, 在一个全局数据结构中以HINTERNET作为key查找, 辗转调用其他几个内部方法获取了一个value.
这个value就是我要找的raw socket handler.
大体逆向出来的流程和细节如下:
-
其中_mapHandleToAddress用ecx, esi接收HINTERNET参数, 返回值放在edx指向的内存单元(这个不同于常规函数, 并未使用eax存返回值);
-
用_mapHandleToAddress的返回值, 调用另外几个内部方法GetSourcePort, GetDestPort, GetSocket等, 其中GetSocket返回的便是我要找的raw socket handler
那用GetSocket的返回值能否调用标准的socket函数呢?
用如下代码验证一下:
HANDLE hProcess = GetCurrentProcess();
DWORD cbNeeded;
HMODULE hMods[1024];
unsigned int i = 0;
if (EnumProcessModules(hProcess, hMods, sizeof(hMods), &cbNeeded)) {
    for (i = 0; i < (cbNeeded / sizeof(HMODULE)); i++) {
        TCHAR szModName[MAX_PATH];
        MODULEINFO modinfo = { 0 };

        // Get module’s name.

        if (GetModuleBaseName(hProcess, hMods[i], szModName, sizeof(szModName) / sizeof(TCHAR)))
        {
            char pModName[sizeof(szModName) / sizeof(TCHAR)];
            int iLength = WideCharToMultiByte(CP_ACP, 0, szModName, -1, NULL, 0, NULL, NULL);
            WideCharToMultiByte(CP_ACP, 0, szModName, -1, pModName, iLength, NULL, NULL);

            if (strcmp(pModName, "WININET.dll") == 0) {
                if (GetModuleInformation(hProcess, hMods[i], &modinfo, sizeof(modinfo)) != 0) {
                    LPVOID baseOfDll = modinfo.lpBaseOfDll;

                    // TODO: get entry point of MapHandleToAddress dynamically rather than hardcoding offset.
                    ULONG64 entryOfMapHandleToAddress = (ULONG64)hMods[i] + 0xB08F0;
                    PDWORD pdwRet = new DWORD[1];

                    // TODO: get entry point of GetSourcePort dynamically rather than hardcoding offset.
                    ULONG64 entryOfGetSourcePort = (ULONG64)hMods[i] + 0x16EA39;
                    PDWORD pdwSourcePort = new DWORD[1];

                    // TODO: get entry point of GetDestPort dynamically rather than hardcoding offset.
                    ULONG64 entryOfGetDestPort = (ULONG64)hMods[i] + 0x16E965;
                    PDWORD pdwDestPort = new DWORD[1];

                    // TODO: get entry point of GetSocket dynamically rather than hardcoding offset.
                    ULONG64 entryOfGetSocket = (ULONG64)hMods[i] + 0x16EA03;
                    PDWORD pdwSocket = new DWORD[1];

                    __asm {
                        mov ecx, hFile
                        mov esi, hFile
                        mov edx, pdwRet
                        call entryOfMapHandleToAddress
                        sub esp, 0x04 /* Not sure why MapHandleToAddress doesn't restore esp correctly, manually restore it */

                        mov ecx, pdwRet
                        mov ecx, [ecx]
                        call entryOfGetDestPort
                        mov ebx, pdwDestPort
                        mov dword ptr[ebx], eax

                        mov ecx, pdwRet
                        mov ecx, [ecx]
                        call entryOfGetSourcePort
                        mov ebx, pdwSourcePort
                        mov dword ptr[ebx], eax

                        mov ecx, pdwRet
                        mov ecx, [ecx]
                        call entryOfGetSocket
                        mov ebx, pdwSocket
                        mov dword ptr[ebx], eax
                    }

                    printf("source port: %d, destination port: %d\n", *pdwSourcePort, *pdwDestPort);

                    struct sockaddr_in serv, guest;
                    PWSTR serv_ip = new wchar_t[128];
                    PWSTR guest_ip = new wchar_t[128];
                    int serv_len = sizeof(serv);
                    int guest_len = sizeof(guest);
                    memset(&serv, 0, serv_len);
                    memset(&guest, 0, guest_len);
                    int ret1 = getsockname(*pdwSocket, (struct sockaddr *)&serv, &serv_len);
                    int ret2 = getpeername(*pdwSocket, (struct sockaddr *)&guest, &guest_len);
                    if (ret1 == 0 && ret2 == 0)
                    {
                        char ServAddrName[NI_MAXHOST];
                        if (getnameinfo((LPSOCKADDR)&guest, guest_len, ServAddrName, sizeof(ServAddrName), NULL, 0, NI_NUMERICHOST) != 0)
                        {
                            strcpy(ServAddrName, "<unknown>");
                        }

                        char ClientAddrName[NI_MAXHOST];
                        if (getnameinfo((LPSOCKADDR)&serv, serv_len, ClientAddrName, sizeof(ClientAddrName), NULL, 0, NI_NUMERICHOST) != 0)
                        {
                            strcpy(ServAddrName, "<unknown>");
                        }

                        printf("server ip: %s, client ip: %s\n", ServAddrName, ClientAddrName);
                    }
                }
            }
        }
    }
}
可见, 通过调用GetSocket内部方法返回的pdwSocket, 用来调用getpeername, getsockname这样的标准socket函数, 能得到正确的结果.
调试汇编的过程有一些trick, 都在代码的注释中体现了.
-
一个基于github的远程团队协作开发模型
画这张图,一是想给新手们讲清楚git的一些基本操作,二是想描述一下我们现在正在用的基于github的协作开发模型。
“Local of $user”是某位成员的本地环境, 涉及到最基本的git操作, 无须赘述。
“Remote”是github上项目的布局情况, 包括主repo, 和每个成员各自fork的repo, 其中主repo的master随时处于shippable的状态, 通过github的release tag可以打”DROP-xxx”的tag生成release.
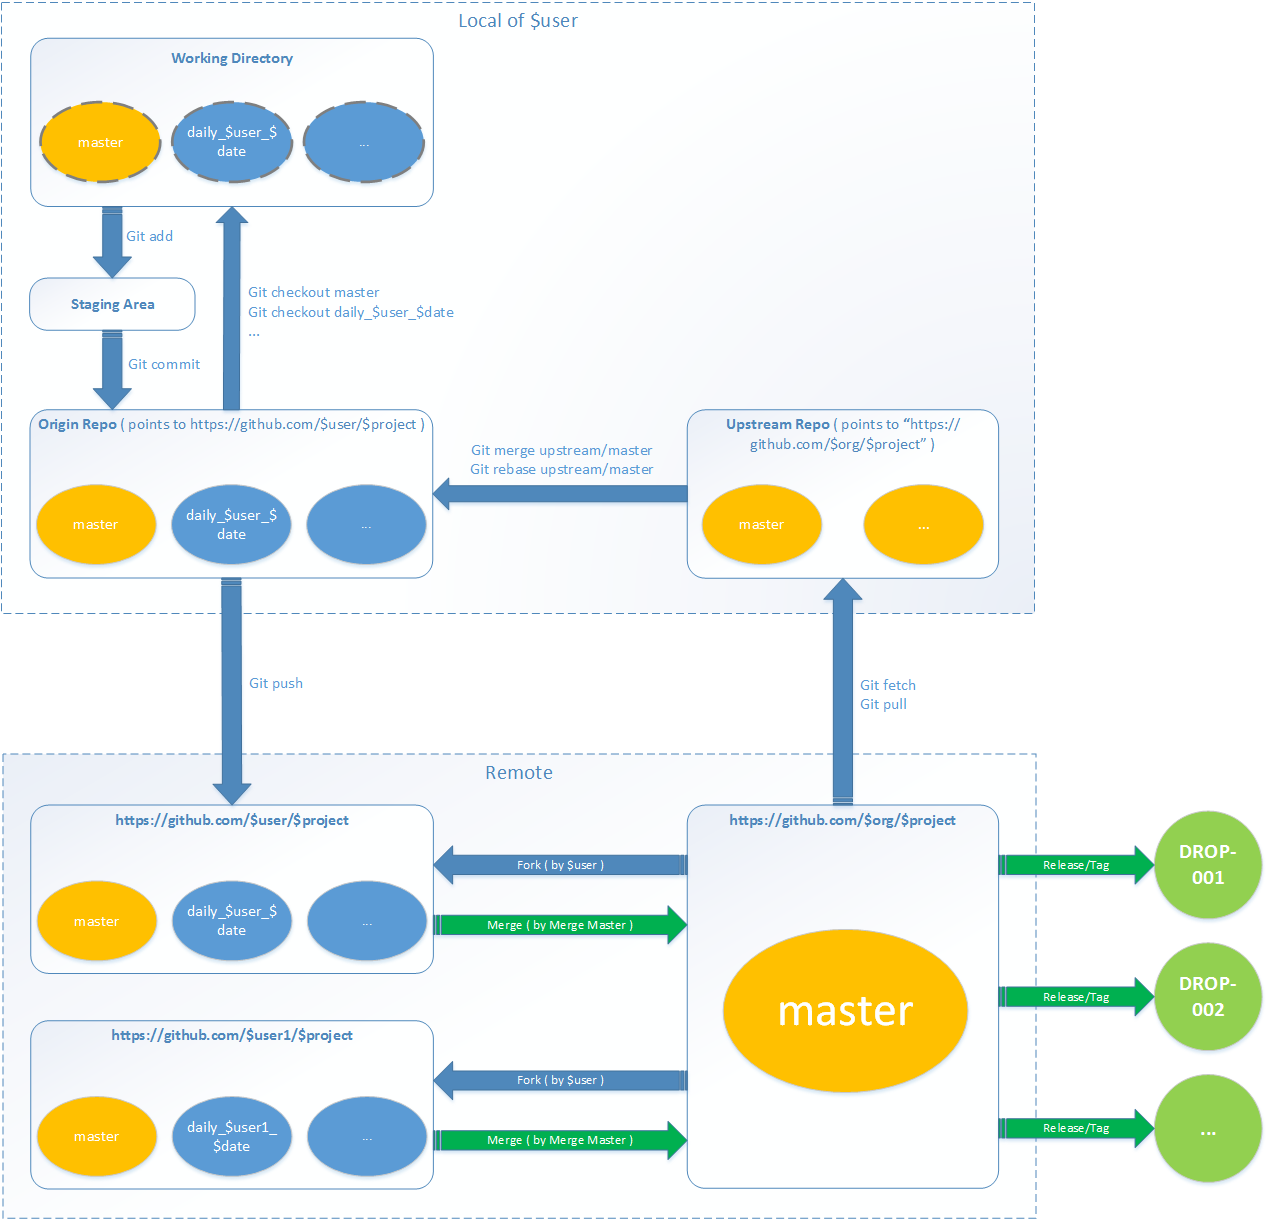
-
JavaScript的Generator和自动执行
thunk函数
thunk函数的定义:能将执行结果传入回调函数,并将该回调函数返回的函数。(呃, 太抽象了…)
通常拿readFile来举例。下面是一个名为readFile的thunk函数:
var readFile = function (filename){
    return function (callback){
        return fs.readFile(filename, callback)
    }
}
readFile如何调用和执行呢?如下:
readFile('./package.json')((err, str) => {
    console.log(str.toString())
    })
可以看到, 在调用readFile的thunk函数后, 异步操作返回结果的获取权, 被交给了thunk函数的调用者。
这便是thunk函数的关键优势: 它将异步操作返回结果的获取权交给了thunk函数的返回值, 而不是把异步操作返回结果的获取权留在thunk函数本身的作用域内。
这一点优势很重要, 能结合Generator语法让Generator函数自动执行。
Generator函数
Generator是从ECMAScript6里引入的新概念。
一个Generator函数示例:
function* readFiles(){
    let r1 = yield readFile('./package.json')
    let r2 = yield readFile('./pom.xml')
}
如果要调用这个Generator函数使其执行完毕并获取结果, 可以用下面的代码:
let g = readFiles()
let r1 = g.next()
r1.value(function (err, data){
    if (err){
        throw err
    }
    let r2 = g.next(data)
    r2.value(function (err, data){
        if(err){
            throw er
        }
        g.next(data)
        })
    })
可以看到, 上面的代码有回调函数嵌套, 而且代码有很多重复. Generator自动执行应运而生。
Generator自动执行
Generator自动执行器的核心代码如下:
function run(fn){
    let gen = fn();
    function next(err, data){
        let result = gen.next(data)
        if (result.done){
            return
        }
        result.value(next)
    }
    next()
}
其核心逻辑是一个递归, 最终是将Generator函数中所有的yield都执行完毕.
调用就是简单的一行:
run(readFiles)可见, 比起直接回调函数嵌套调用readFiles简单直观。
使用Promise代替thunk函数
第一部分的readFile thunk函数可以改写为基于Promise的方式:
function readFile(fileName){
    return new Promise((resolve, reject) => {
        fs.readFile(fileName, (error, data) => {
            if(error){
                reject(error)
            } else {
                resolve(data)
            }
        })
    });
}
和第一部分的thunk函数相比大同小异, 只是把函数返回值的获取权以Promise的方式交出.
https://github.com/BriteSnow/node-async6 实现了Generator自动执行器.
-
最近学习maven的一些记录
最近在看一个轻量级web application的框架。 这个轻量级web application框架的,包管理、编译、打包都是通过Maven来实现的。 并且通过使用Maven的Jetty插件启动运行。
以前对Maven只是停留在使用的层面,没有耐心和时间深钻,便趁这个机会深入了解了一下。
Maven的生命周期
Maven有一个生命周期的概念,有三套(这个量词是”套”):
- clean
- default
- site
上述三“套”生命周期,各自包含有不同的阶段(Phase); 不同的阶段(Phase), 各自挂接一个或多个目标(Goal);
所以,这三个名词的包含关系是这样的: 生命周期(clean, default, site) -> 阶段(Phase) -> 目标(Goal);
以阶段(Phase)来构建
举例,最常用的”mvn clean”命令中, clean指的是某个阶段(Phase)。
“mvn clean”指的是mvn会从clean这个阶段(Phase)所在的生命周期的第一个阶段(Phase)开始,执行到clean这个阶段(Phase)为止。
在这个执行的过程中, 每个阶段(Phase)上挂接的每个目标(Goal)都会得到执行。
每个阶段(Phase)也有对应的默认的plugin来负责处理,我们可以在pom.xml中的
节点里配置每个阶段(Phase)的plugin。 以目标(Goal)来构建(以Maven的Jetty插件举例)
举例, 在“mvn jetty:run”命令中, run是jetty插件的一个目标(Goal)。 在jetty插件的实现中,run这个目标的mojo声明为:
@execute phase="test-compile"并没有类似于下面这样的mojo声明:
@phase="compile"意味着run这个目标并没有被绑定在任何的阶段(Phase)上。
那么”mvn jetty:run”这个命令做的事情是:
- 编译到test-compile这个阶段(Phase);
- 执行run这个目标(Goal);
-
一个关于ntext和nvarchar(MAX)的issue
最近在维护一个SQL Server数据库中发现一个问题。
nvarchar(MAX)存入中文时,显示为???乱码。
google了一番,将字段类型改成了ntext,存中文便没了问题。(这个改法其实是有问题的,后来一番google得知,ntext已经被遗弃不用了,都推荐使用nvarchar(MAX)了,但是为什么nvarchar(MAX)存入中文会显示???乱码,这个作为一个问题以后再研究)
但是该字段被改成了ntext后,造成了其他一些业务逻辑上的问题。
一番跟踪后,发现是一个Store Procedure用了如下语句做判断:
IF((SELECT SettingValue FROM bvc_WebSettings WHERE SettingName = 'xxx') = 1)其中SettingValue正是被我改为ntext类型的字段。
字段类型改为ntext后,这个if里的语法就有问题了,原因是ntext不能直接和integer做比较。
需要更改为:
IF cast((SELECT SettingValue FROM bvc_WebAppSetting WHERE SettingName = 'xxx') as nvarchar(max)) = 1